Just as I am now, every year, I take some time to look back on the development of my Kindergarten writers over the course of the year. While the instructional decisions I make are based on weekly formative assessments and reflection on individual and group needs, it has been really interesting to go back and look at how far they’ve come and how they got there. I find that there is nothing more powerful than looking at student work as a way to develop even more as a writing teacher so I thought I would start to share some of these on my blog. Here are some samples from the writing life of one of my Kindergarteners last year, in chronological order.
HG’s development as a writer from September to April
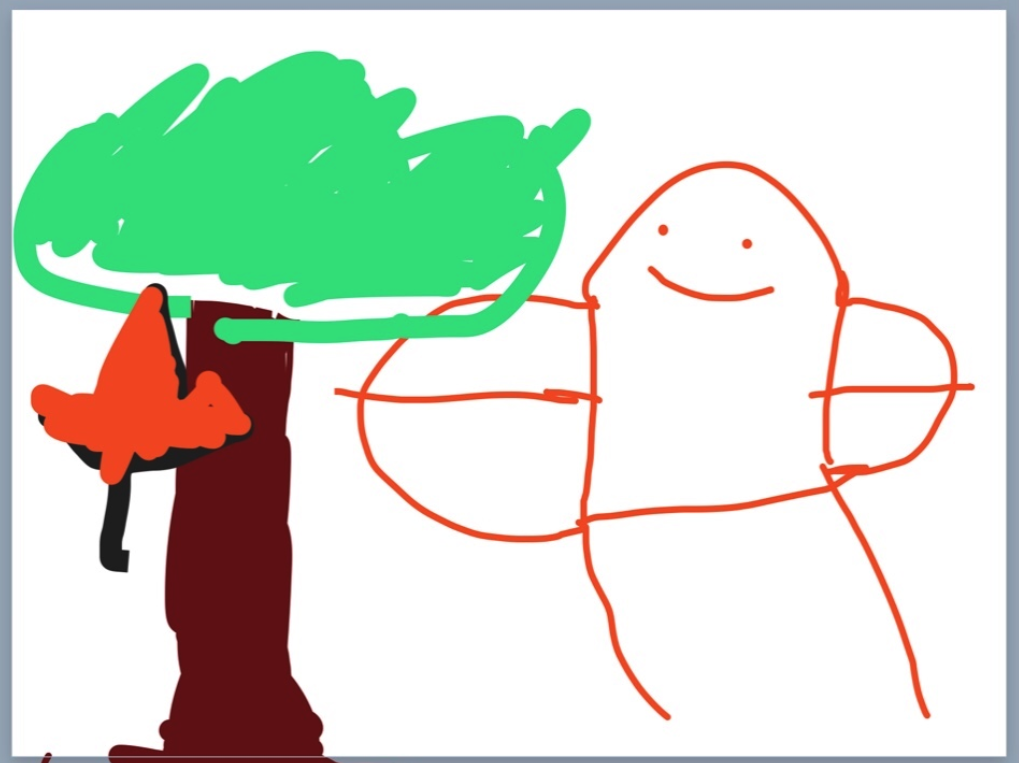
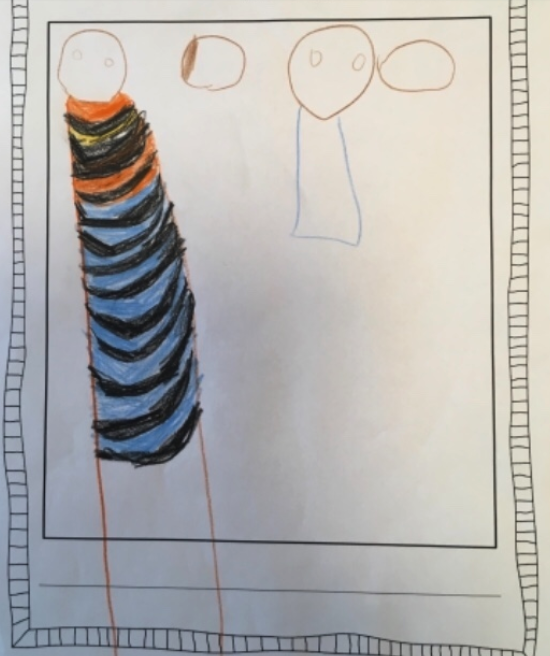
At the start of the year, as was the case with most of my Kindergarteners, HG used pictures to put his ideas on paper. We looked back at the first writing samples together and he noticed immediately how much he has grown in his ability to add details to his drawings.
“It makes sense that this was from the beginning of the year because I used hardly any details.”“This is my tooth fairy. She is a maple fairy. I used more detail.”
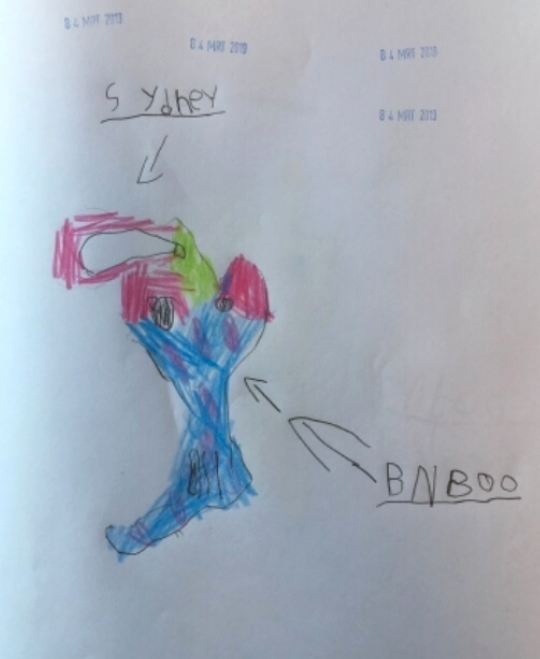
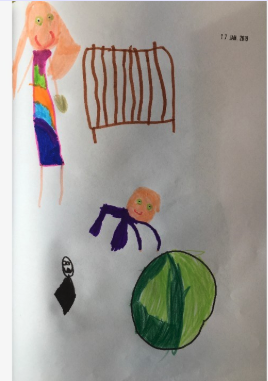
By mid-year, HG had started choosing his character or subject before putting marks on the page. He was able to discuss his color choices and point out details like parts of the body and shapes that he had purposefully added. He was beginning to experiment with strings of letters to represent words.
“I used lots more details like colors and shapes.”
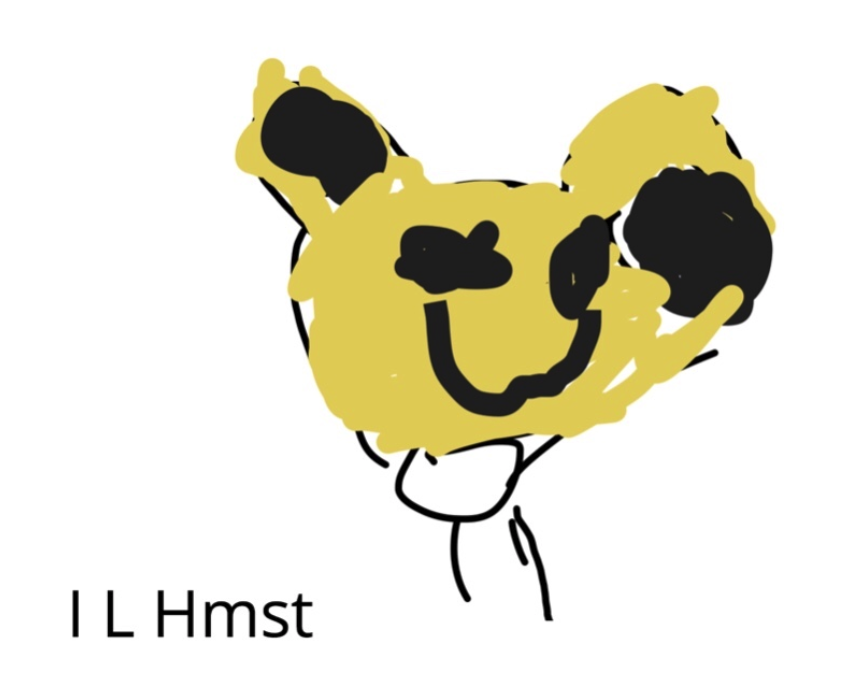
It wasn’t long before HG was using words that he knew, such as proper names of family, friends and familiar toys, and starting to use letters to represent initial and dominant sounds.
My Beanie Boo
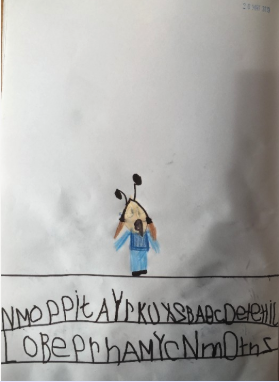
During our unit on all-about books, HG demonstrated an understanding that there are spaces between words and started crafting sentences to match his pictures.
I like hamsters.
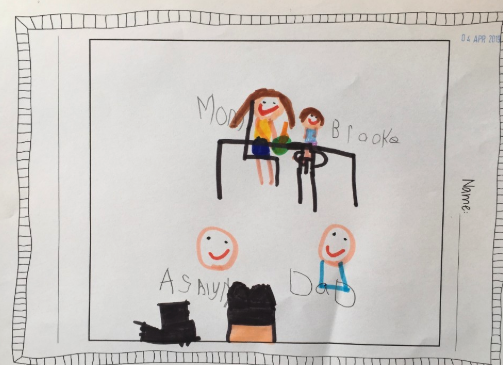
HG recognizes that he sometimes forgets to do some of the things he already knows to do to make sure his reader understands what he’s written.
“I need to add more details, like hair, color and feet.”
Looking at student work is one of the most powerful sources of professional development available. Collaboratively looking at student work increases that value beyond measure. Whether on our own or with colleagues, the time we take to look deeply at student’s writing helps us to develop a plan for how to support individual writers in their stage of development at a given moment. It also helps us develop our own understanding and recognition of the stages of development, as well as the many bends in the road for a developing writer.
It is so important to consider all aspects of the developing writer in the early years. Teachers can quickly become distracted by the amount of print that may or may not be on the page, or by the control the writer might exhibit over his or her drawings.
Here are two tips for looking at student writing samples:
Know the background: if it is your student, you probably already do. If it is a student you don’t work with, it is crucial to know more about the process the student has gone through, what he or she has said during conferences or at other times regarding the writing. So much of the “work” our youngest writers do is not detectable on the page alone. That which is detectable often needs the curation of an adult who was along for the journey. If collaboratively looking at work samples, I recommend using a modified version of a protocol such as LAST or ATLAS. Protocols such as these provide the opportunity to get a more inclusive picture of the “work” that has been done.
Resist the urge to compare writers: Unless you are looking to better understand what different stages of writing look like in the context of a group of students, I see very little value in comparing different writers. More often, the comparison of writers leads to a “ranking.” Such ranking often neglects the many facets of a writer’s development which are not immediately apparent when comparing one student’s writing to that of another writer. Alternatively, looking at several samples of the same writer’s work over time, brings his or her individual development to the surface and can be very powerful in helping us to make decisions about how best to support that writer. For me, this is also a very encouraging practice as I often see so much more growth when I see a collection of a student’s writing over time. The samples below are a collection of one Kindergartener’s writing over time.
What do you notice about the development of this writer over the course of eight months?
First story in Kindergarten.Me, My Mommy and My Sister-November 2018When My Mommy Took Me Out Of My Crib-January 2019When the teacher wore pj’s to school-March 2019
The Understanding Map is one of the products of the work being done at the Visible Thinking and Cultures of Thinking projects at Harvard’s Project Zero. It has been an integral part of the teaching and learning in my classroom since I first learned about it years ago. Its universal applicability and relevance make me consider it as perhaps the one tool I would choose as a teacher if I could have only one. Regardless of age group, context, style of teaching and learning or discipline, the Understanding Map provides a guide to deeper understanding.
I recently introduced the Understanding Map to a group of educators at a workshop on concept-based teaching and learning, which I facilitated with the amazing and deeply knowledgable @gioia_morasch. Working with these educators reminded me of how lucky I am to have received training from Project Zero and how important it is to share the wealth.
This year, I have had the challenge of figuring out the best way of using the Understanding Map to support my Kindergarten students on their learning journey. I find that it is not so very different from how I use it with fourth or fifth graders. Here are some quick tips that work across the grades:
Eight Ways to Use the Understanding Map Right Now
Explicitly let students know that the moves on the Understanding Map are steps our brain takes to help it as it works to build understanding. Depending on the group, I may do this right away, or I may wait until they’ve heard me naming their thinking moves for a while. In either case, I remind them often why these moves are important. This continues until they start reminding each other…and they do!
Name the types of thinking the students are doing when you witness them doing it. “I notice that you backed up your idea with something you can refer back to in the text. Reasoning with evidence is one of the moves we use to help us make sure our understanding makes sense.”
Make connections between the map and what they know they already often do. In many cases, we start with wondering. This is often the easiest move for them to recognize in themselves. Further, by highlighting it as an all-important thinking move on the road to understanding, we encourage them to continue valuing that sense of wonder and curiosity.
I occasionally teach a minilesson to help the students understand what we mean exactly by a particular thinking move. It’s important to note that whenever possible, this is pulled from the thinking or actions of a shared context or the thinking of a peer.
Use Visible Thinking routines. Scaffold students in making connections between the thinking they are doing in the routine and the types of thinking on the Understanding Map.
Perseverance is key! Regardless of age, it can take months of consistently using the language and promoting the importance of a thinking culture in the classroom.
Parents are part of the learning community too! Share the Understanding Map with them and encourage them to use it when discussing their students’ learning at home. We use it at Student-Led Conferences as well.
Post the Understanding Map prominently in your room. With younger students, consider how you can incorporate visuals. At the start, it will serve as a prompt and a reminder for you. Eventually, you will find yourself referring to it alongside the students. Soon enough, your students will start referring to it independently!
I am a firm believer in collaboratively constructing assessment criteria with students in order to determine what has been learned. I also know from experience that the process of creating, reviewing, revising, and applying criteria with fourth-graders can be a lengthy process. It is also one which can lose effectiveness if we don’t maintain momentum. We need time to discuss, chart ideas, categorize, test-through-application, and revise our criteria. This year, as I prepared for 4JR’s first collaboratively constructed assessment, I decided to try using Google Apps For Education-GAFE.
Using Google Docs To Chart and Draft Criteria:
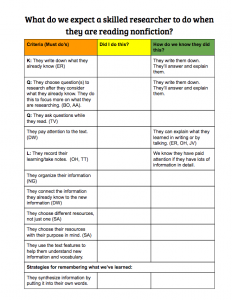
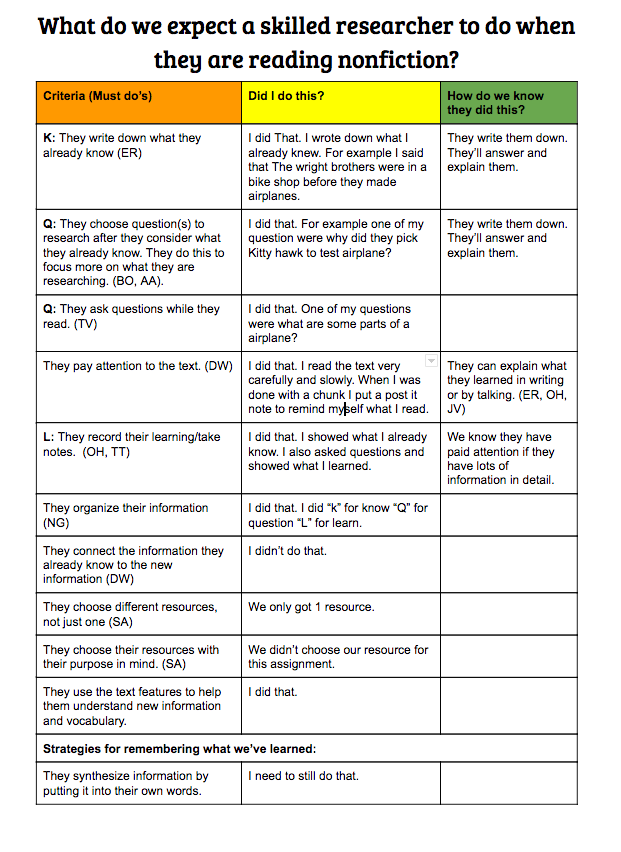
As my fourth-grade class neared a stopping point in our nonfiction and research unit, we started discussing how we would know what we learned. The students knew throughout the unit that they would do a post-unit assessment. They expected to evaluate what they took away from the unit and what might need to be reviewed or extended in a later unit. When it came time to discuss criteria, I gathered the students together in front of our SMART board and asked:
I set up the google doc prior to the lesson. As we discussed the criteria, an assessment tool was born. Where there was confusion, we discussed what could be observed to know if a researcher had met the criteria. These discussions were captured in the third column.
I originally planned to categorize the criteria at this time, but as we continued the discussion, I sensed they needed to work with the criteria first. I decided it was enough to generate criteria and discuss how we would know for now and to come back to categorizing later.
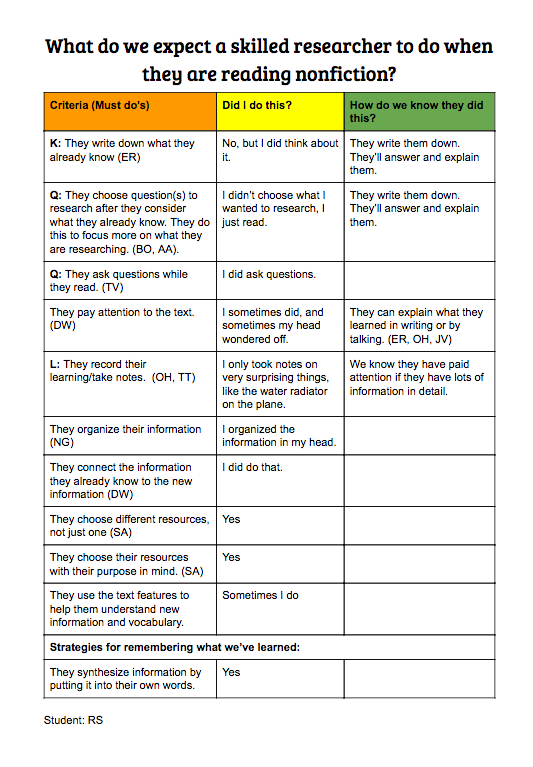
The students first applied the criteria to the post-assessment they had completed the day before. Once we had our working document, I immediately pushed the doc out to them using our Google Classroom and sent them off to assess their research skills and behaviors with their reading partners. Here are a few samples of what I got back:
Student: KN
After actually applying the assessment to their own work, evidence emerged on what students were doing as researchers. It also became evident which criteria students understood enough to discuss in detail when applied to their own work.
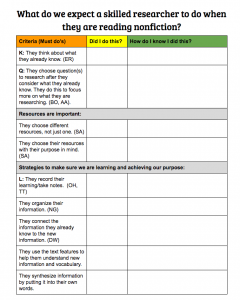
Ready to Revise:
The “final” tool, complete with categories.
We reconvened at the end of the session. At that point, I felt the students were ready to consider how we might organize our criteria. I asked them if any of our criteria could be categorized into groups. We use Project Zero’s Visible Thinking routine, “Generate, Sort, Connect, Elaborate,” often in our community, so this was a fairly accessible question. The students discussed how we could reorganize our criteria and we ended up with a “final” tool for future use. The students can now access this rubric at any time using our Google Classroom.
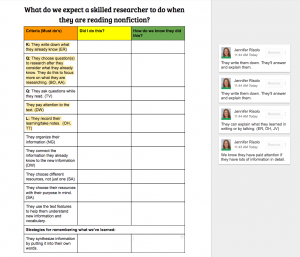
Reflections:
Using comments to annotate the discussion leaves the reflection boxes open for student’s individual reflection. Next time, I want to record the initial discussion about how the criteria might be observable in comments, instead of in the green column. I think that will make it clearer to my students that they should back up their assessment of their own work with evidence.
This lesson took just under 90 minutes. Some students did not make it all the way through the criteria when they were self-assessing but I was confident that they’d had enough interaction with the criteria and tool to discuss the categorizing and other possible revisions. Those students finished their individual assessments at home that evening for homework.
I will definitely use this process in the future. As the students become ready to evaluate themselves in more depth, we can move into more of a rubric than a checklist-with-explanation.